Android Emulator vs iOS Simulator,
Connecting MonkeyTalk IDE to iOS Real Device Emulator Simulator
Let us connect the MonkeyTalk IDE to
Simulator, emulator and to Real Device:-
Monkeytalk IDE appear as:
MonkeyTalk IDE is like a app of desktop
for recording, playback and creation of the testing case script.
Img -
 |
| Connecting MonkeyTalk IDE to iOS Real Device |
Android emulator Vs iOS Simulator :
→ Open the IDE
→ Now Start the iOS emulator or
simulator or the Android and load it with enabled apps of MonkeyTalk.
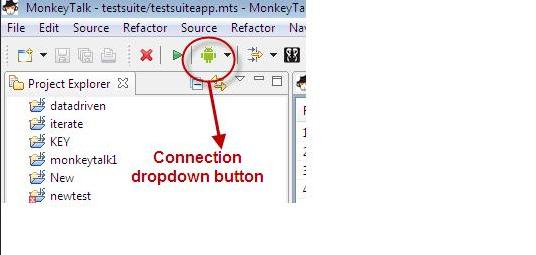
→ Now Click on the drop-down button
for connection from the visible tool bar (at initial start up it can
be the green android icon.)
 |
| Android emulator Vs iOS Simulator |
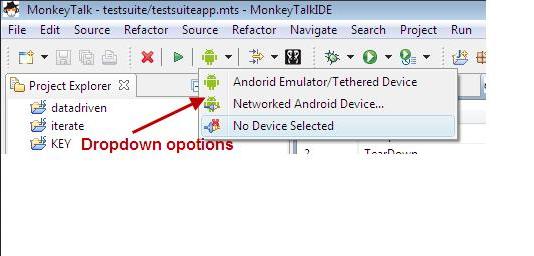
→ Select the Option from the
connection drop-down with the help of you want to connect IDE.
 |
| MonkeyTalk connection IDE |
Note That: If
we are connecting the Android device for the first time and we shall
be prompted to point MonkeyTalk IDE to our local Android SDK. Need to
Test the “Include Android Testing?” Check box and the pointing it
to the SDK. We can also set it in our MonkeyTalk Preference.
→ If
connection was passed then a message to with effect must be appear on
the console screen:
 |
| Android and iOS Real Device |
Android and iOS Real Device:
i. Open now IDE
- Just Start the Android or iOS device, First connect it to our wireless network on local server, and now reload it with our Monkeytalk activated Apps.
- Now click on the button of connection drop down from the tool bar (on the initial start up, it will be the green android icon).
- Select the 'Networked Android or the iOS device'.
- Input the address of IP of mobile device.
- If it connected successfully and properly then message for that effect must be visible on the console.
Near Field Communication Support NFC Smart Poster Support Use of add-ins Cookies in QTP
Mobile Testing with QTP How to install .ipa files for ipad iphone Touch Screen Simulating User Gestures
MOBILE APPS QTP TESTING QUESTIONS MANUAL TESTING ANDROID APPS


No comments:
Post a Comment