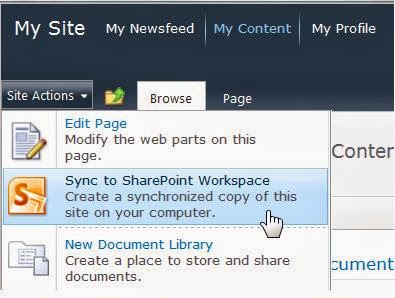
What can I do with the Workspace
We can do the actions given below with the help of Workspace:
- Re-size the workspace with the help of hooks at the right or
left corner of the top of the Mac menu-bar of applications.
- Transfer the workspace. Just click and hold the yellow
sessions title bar or Mac menu bar with the mouse and transfer it to
a wanted locations.
- Maximise workspace to the complete desktop size on the
present monitors.
- If remote size of desktop on the Mac doesn't run into the local size of desktop on the PC then the Mac window will be stretched on desktop of Windows.
- If options "Constrain proportions" is activated in the "Workspace Options" then Mac windows will restrain proportion on the desktop of Windows. Otherwise Mac window will be stretched dis-proportionately.
- To display the workspace with the primary Mac desktop size, use "Reset Workspace Size" actions.
- Minimize / Restore workspace.
Creating the new Groove workspace
We can make up a new Groove workspace from the Launchbar or from
the Backstage views.
- First on Click New and then click on Groove Workspace.
- Need to Type the workspace name.
- To alteration the workspace versions for the newly workspace,
click on the Options, and then select the version we like
from the drop down menu.
The workspace versions decides the tools list that will be present
for adding to the workspace. It also set the versions of requirements
for the peoples who can become member of workspace. For an example,
peoples who are still executing the Office Groove 2007 can only link
workspace that includes the versions 2007 tools (or before).
- Finally Click Create.
SharePoint Workspaces develop the Groove workspace and lists us as
the initial members with the role of Managers. We can now add or edit
the workspace tools and invitation of peoples to join the member.
Making the new workspace from any template
If we have stored an existing Groove workspaces as the template or
have the accesses to Groove workspace template made by other, we can
utilize these as the base of new workspaces.
- Visit the Backstage view and then click on New.
- Click on Workspace from Template View.
If the file of workspace template is saved in the Groove
Workspace Templates folders in My Document (the default
locations), We can choose it in the dialog box. Of Browse If
it is saved in another folders, we will require to go to the folders
in the Browses dialog box and then choose it.

What can I do with the Workspace
3. Click on Open now.
Making the new workspace by an archive
Generally, the motto for creating a Groove workspace from an
archive is to save workspace. For more info, view the Saving the
workspace as an archives, and browsing the workspace by an archive.
Developing the SharePoint workspace, opening from the Launchbar or the Backstage views
- Click on New and then click on SharePoint Workspaces.
- Required to Do one of the given below:
- If listed, click on SharePoint website from which we like to download the content.
- If the SharePoint website we like is not listed, input the
Website address for the website inside the Location box.
To escape typographical error, we can copy and paste the
SharePoint website Web addresses from the Web browsers.
- If we like to download all libraries and supported lists , Then just click OK.
- If we like to download chosen libraries and lists, click on Configure...
- In the dialog box of Configure Settings, alter the download setting, as wanted, for each list or library by clicking the menu of drop down menu from the column of Content.
- Then Click on OK.
The sync progress dialog box opens to support us advised about the
progression of the downloaded from the SharePoint website from the
SharePoint workspace.
- When download finish, then click on Open Workspace or
Close.
If we antecedently downloaded item from only chosen libraries and
lists, we can download the another libraries and lists later as
required.


No comments:
Post a Comment